本系列是北航计算机学院于 2024 年春季学期开设的一般专业课《FPGA多核并行计算》课程的实验报告记录,由于学习过程中掌握并不牢靠,如有错误请读者不吝赐教!
深度学习编译器:TVM 实验说明与实验相关内容上传在 Github 仓库中。实验过程中使用到的环境与程序:
Apache TVM 是一个开源的机器学习编译框架,用于 CPU、GPU 和机器学习的加速。它的设计目标是令机器学习工程师可以在不同的硬件后端高效地优化和运行计算过程。
实验分析
掌握TVM运行环境的配置方法
使用TVM对darknet平台生成的模型进行编译
配置 TVM 运行环境 配置 TVM 环境前,需要预先准备好其编译链工具:
gcc 9.3.0
llvm 11.1.0
python 3.7
git 2.25.1
若环境未安装可按照实验文档进行安装,经验证在线实验平台上所有环境均满足
apt-get install -y gcc libtinfo-dev zlib1g-dev build-essential cmake libedit-dev libxml2-dev
这里的编译过程使用了课程平台提供的 tvm 整合包,其中包含了其他链接仓库,若从原始仓库 clone 并编译,需要拉取多个链接仓库。
可使用 git submodule update --init --recursive 下载包含的子模块,或从实验代码仓库中获取整合包
解压后创建构建目录 build、放置 CMAKE 文件,再修改 TVM 的构建参数如下,满足实验平台的硬件设置和使用需求:
禁用CUDA(GPU平台): 仅使用 CPU 设备计算
启用图执行器: 使用图执行器(Graph Executor)运行和管理深度学习模型的计算图,它是一种用于优化和执行深度学习计算图的工具
启用探针程序: 在项目运行时将收集性能相关的数据,从而进一步分析优化模型
配置llvm地址: 使用 llvm 作为程序后端输出
配置VTA模拟器: VTA(Versatile Tensor Accelerator)是一个灵活的张量加速器,主要用于深度学习推理和训练的加速
set (USE_CUDA OFF)set (USE_GRAPH_EXECUTOR ON)set (USE_PROFILER ON)set (USE_LLVM ON)set (USE_VTA_FSIM ON)
编译时间较长,若过程中缺少其他依赖时需要再进行补全
rm -rf /headless/.tvm_test_data export TVM_HOME=/path/to/tvmexport PYTHONPATH=$TVM_HOME /python:${PYTHONPATH} pip37 install scipy numpy decorator install attrs
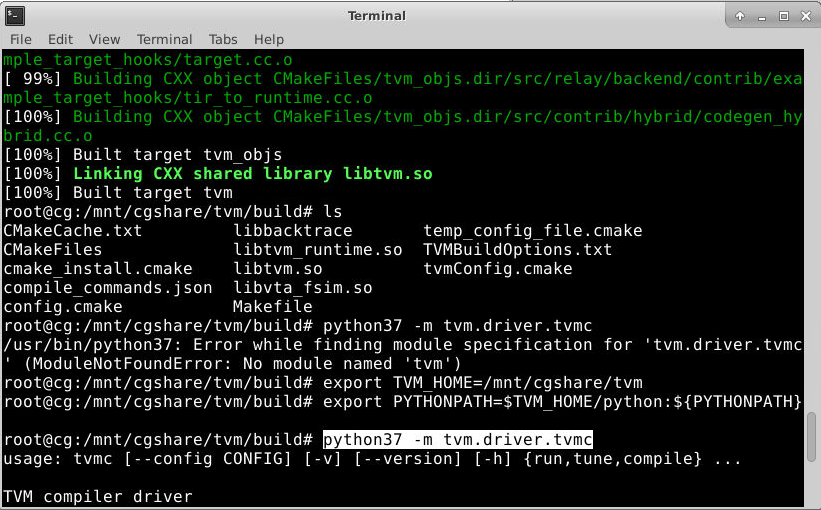
至此,TVM 环境配置工作完成,可通过以下指令确认是否正确安装
python37 -m tvm.driver.tvmc
编译 YOLOV3 模型
本章节的处理思路来源于官方文档 Compile YOLO-V2 and YOLO-V3 in DarkNet Models ,源代码的数据、权重文件等均从 Github 直接获取,若网络访问不便捷可以先预下载文件,并将内部所有使用到如 lib_path = download_testdata(DARKNET_URL, DARKNET_LIB, module="darknet") 的部分改为本地路径引用即可
pip37 install cffi opencv-python
创建一个 python 文件(yolov3.py),文件内容组织如下,代码文件可见仓库 :
引入依赖包、选择模型
选择下载后的文件
将模型实现为 Relay 形式
加载测试图像
在 Runtime 上执行模型
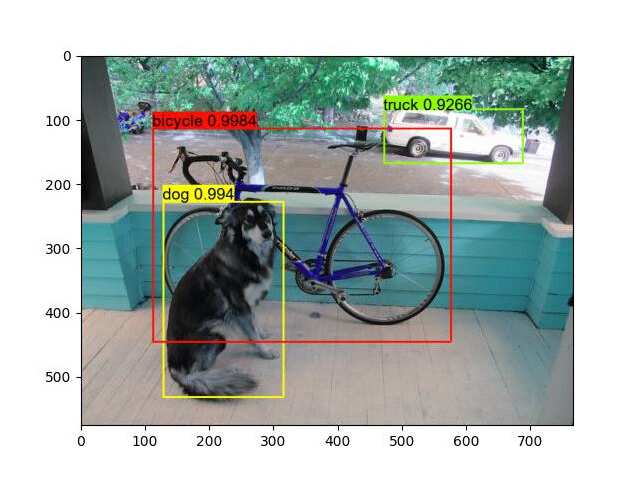
执行检测后的图像如下所示:
实验思考 实验过程截图
截图粘贴TVM成功配置的截图及YOLO算法实验结果
成功配置 TVM 的截图和 YOLO 算法实验结果已在上文贴出
已训练模型的 TVM 运行
任选一个在公开数据集上进行训练的神经网络模型,仿照上面实验步骤使用 TVM 运行。截图粘贴运行结果,说明模型结构(可使用可视化工具)以及数据集。
在本部分我选用了在实验 2-1 中已训练好的 MNIST 网络模型,先在本地电脑中使用 pytorch 导出其网络结构为 onnx 结构的文件,再于在线实验平台中利用 onnx 将其重新加载,并运行在 TVM,实现模型的迁移与优化
本节所用的所有代码文件可见仓库
在本地电脑基于 pytorch 的原有网络模型的基础上导出 onnx 配置
import torch.onnxtorch_model_path = 'net.pth' onnx_model_path = "mnist_model.onnx" torch.save(net.state_dict(), torch_model_path) model = Net() model.load_state_dict(torch.load("net.pth" )) model.eval () input_tensor = torch.randn(1 , 1 , 28 , 28 ) traced_model = torch.jit.trace(model, input_tensor) traced_model.save("mnist_model.pt" ) sample_input = torch.randn(1 , 1 , 28 , 28 ) torch.onnx.export(model, sample_input, onnx_model_path)
若不执行第一次的 save 过程,可能在执行过程中第 14 行会报错,加上上面的 save 再重新 load 就没有问题了:
RuntimeError: Expected all tensors to be on the same device, but found at least two devices, cpu and cuda:0! (when checking argument for argument weight in method wrapper___slow_conv2d_forward)
导出参数和网络结构后回到在线实验平台中,创建 mnist.py 文件进行模型加载、优化、运行,注意运行时需要引入 MNIST Dataset (仓库中还有 ipynb 分段的文件,但窘于实验平台配置 jupyter notebook 较为繁琐所以没有保存运行内容)
""" # -*- coding: utf-8 -*- # @Time : 2024/4/3 20:45 # @Author : CookedBear # @File : mnist.py """ import tvmfrom tvm import relayimport onnximport numpy as npimport structtest_images_idx3_ubyte_file = 't10k-images.idx3-ubyte' test_labels_idx1_ubyte_file = 't10k-labels.idx1-ubyte' def decode_idx3_ubyte (idx3_ubyte_file ): bin_data = open (idx3_ubyte_file, 'rb' ).read() offset = 0 fmt_header = '>iiii' magic_number, num_images, num_rows, num_cols = struct.unpack_from(fmt_header, bin_data, offset) image_size = num_rows * num_cols offset += struct.calcsize(fmt_header) fmt_image = '>' + str (image_size) + 'B' images = np.empty((num_images, num_rows, num_cols)) for i in range (num_images): images[i] = np.array(struct.unpack_from(fmt_image, bin_data, offset)).reshape((num_rows, num_cols)) offset += struct.calcsize(fmt_image) return images def decode_idx1_ubyte (idx1_ubyte_file ): bin_data = open (idx1_ubyte_file, 'rb' ).read() offset = 0 fmt_header = '>ii' magic_number, num_images = struct.unpack_from(fmt_header, bin_data, offset) offset += struct.calcsize(fmt_header) fmt_image = '>B' labels = np.empty(num_images) for i in range (num_images): labels[i] = struct.unpack_from(fmt_image, bin_data, offset)[0 ] offset += struct.calcsize(fmt_image) return labels def load_test_images (idx_ubyte_file=test_images_idx3_ubyte_file ): return decode_idx3_ubyte(idx_ubyte_file) def load_test_labels (idx_ubyte_file=test_labels_idx1_ubyte_file ): return decode_idx1_ubyte(idx_ubyte_file) test_images = load_test_images() test_labels = load_test_labels() print ("data installed!" )onnx_model = onnx.load("mnist_model.onnx" ) target = "llvm" input_shape = (1 , 1 , 28 , 28 ) input_name = "input.1" mod, params = relay.frontend.from_onnx(onnx_model, shape={input_name: input_shape}) with tvm.transform.PassContext(opt_level=3 ): lib = relay.build(mod, target=target, params=params) ctx = tvm.runtime.device(target, 0 ) module = tvm.contrib.graph_executor.GraphModule(lib["default" ](ctx)) print ("model loaded!" )print ("tranvse " + str (test_images[0 ].dtype) + " to " , end="" )test_images = np.expand_dims(test_images, axis=1 ) / 255.0 test_images = test_images.astype(np.float32) test_labels = test_labels.astype('int' ) print (test_images[0 ].dtype)correct_predictions = 0 total_predictions = len (test_images) print ("evaluation start!" )for i in range (total_predictions): module.set_input(input_name, tvm.nd.array(test_images[i:i+1 ])) module.run() output_data = module.get_output(0 ).asnumpy() predicted_label = np.argmax(output_data[0 ]) correct_predictions += (predicted_label == test_labels[i]) accuracy = correct_predictions / total_predictions print (f"Model accuracy on test set: {accuracy * 100 :.2 f} %" )
在加载输入数据的过程中,在 96 行中 set_input() 函数出错的状况,仔细分析报错信息:
TVMError:
An error occurred during the execution of TVM. For more information, please see: https://tvm.apache.org/docs/errors.html
Check failed: from_size == to_size (6272 vs. 3136) : TVMArrayCopyFromTo: The size must exactly match
发现是输入给 TVM 模型的数据和入口数据格式不统一,单图片有 28pixel * 28pixel 的像素资源,并且信息中 3136 = 28pixel*28pixel*4byte;6272 = 28pixel*28pixel*8byte
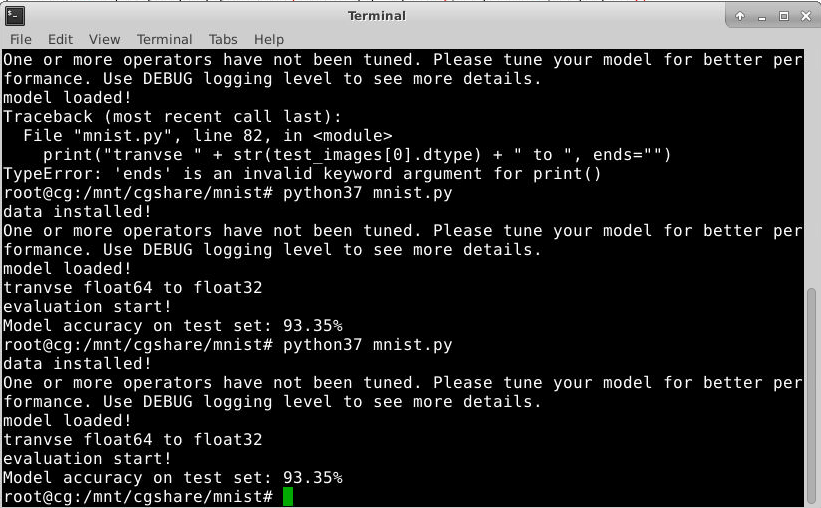
最终发现是因为 TVM 输入时采用的是 float32,但是从数据处理函数中获得的数据格式为 float64,所以一直会差这么一个二倍的关系,再第 85 行执行一个数组转型函数即可解决此问题,最终实验结果:
模型分类的准确率:93.35%
实验总结 本次实验通过在在线实验平台上编译 Apache TVM 实现已有模型在不同的硬件后端的性能优化。
实验部分 1 实现了 TVM 在 Linux 系统下的自行编译过程
实验部分 2 实现了对 YOLOv3 的 llvm 优化
实验思考题部分实现了对一个 MNIST 的 pytorch 架构模型导入到 TVM 进行加载优化的过程


